Glass & Combined Technique
29 cm x 39cm x 4 cm, 2008 (3/12)
Untitled - Glass Gellage No. IV
Glass & Combined Technique
39 cm x 31 cm x 4cm, 2008 (6/12)
Lucas Simoes
Desmemorias y Desretratos


Maurizio Anzeri
 Mia
Mia Embroidery on photograph
48cm x W33cm
Enrico - 2014
Embroidery on photograph
18 x 13 cm

Leopold - 2014
Embroidery on photograph
38 x 30 cm


Lee towndrow


Kalle Gustafsson


Thomas Kettner


How
lighting should be set up
Rembrant Lighting


With Rembrandt lighting the main light is on
the right of the subject which produces the maximum amount of like on the right
of the subjects face, to the left of the subject there is a fill this is there
to just capture the details of the left side of the subject face instead of it
being too dark. The hair light I positioned quiet close to the subject head
bringing out the detail in the hair and the top of the head. The back light is
placed in the standard position behind the subject creating a brightness making
the subject stand out more.
Clamshell lighting is usually used in fashion
photography with two key lights at the front of the subject one high above the
subject and one facing up at the subject, although they aren’t just bare lights
there are filtered with an umbrella which softens the light and makes the
lighting not too harsh so it doesn’t pick up any details on the subjects face.
Backlight


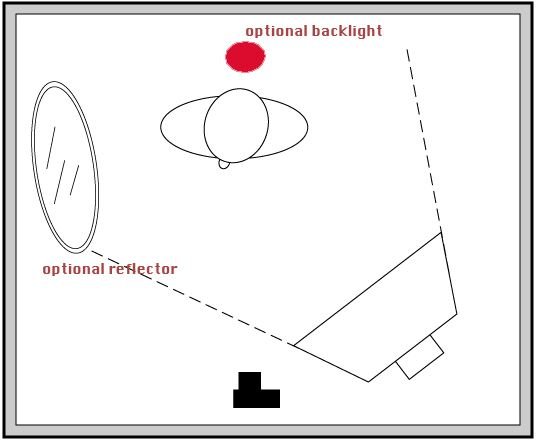
Behind the model there is a backlight place
which makes the main light shine around the back of the models head; this
creates more focus on the model and creates depth. Although this isn’t the only
camera in the studio there is a main light filtered with a soft box in front of
the model which lights up there face but doesn’t ever power the details, there
is also a reflector which is optional but if you have the reflector it adds a
tint of light onto the lift side and works like a fill light.
Rim lighting


Rim lighting is where two lights
are placed just behind the model shinning towards the camera exposing each side
of the models face, this technique is good because it creates an almost
symmetrical lighting effect on the model, in from of the model you can also
have a reflector this bounces the light onto the front of the model face
creating a bit more detail on the models face and makes the face more visible.


No comments:
Post a Comment