Thursday, 12 November 2015

Photographic Theory and Practice - Light Meter and Metering Modes


Metering modes
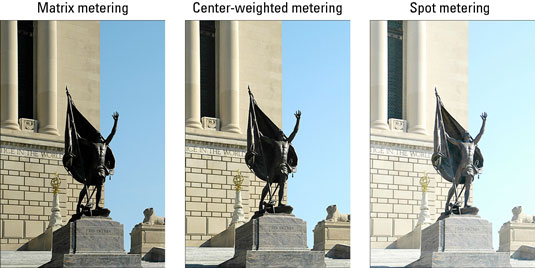
In photography there are 3 different types of light meter modes these are:-Evaluative Metering (on Canon cameras), or Evaluative/Matrix Metering (on Nikon cameras) this is usually the default metering mode on most cameras. -Partial Metering (on Canon cameras), or Spot Metering (on Nikon cameras) this metering mode is used for when the photographer wants to expose a certain part of the photo because the camera reads the lighting on one specific spot.

Center-Weighted Average Metering (on Canon cameras), or Center-Weighted Metering (on Nikon cameras) this metering mode gives priority to the center of the photo but also takes the surrounding areas into consideration. Because it focuses on the center of the photo it is best to use this setting then subject is placed in the middle of the photo.
 

Zone System 
The Zone System was a technique made by Ansel Adams and Fred Archer in 1930. The zone system was made to best ensure the right lighting and the right exposure in every situation. The zone system is many used when the camera is tricked in to thinking a scene is too bright or to dark when it’s actually not. Even though the zone system was originally made when only black and white was used it is also applicable to roll film, colour, negative and reversal and digital photography.
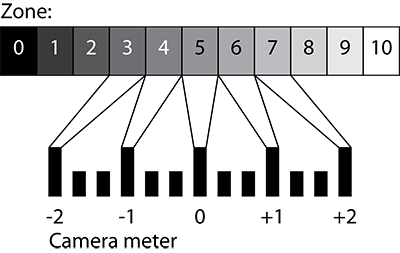


The Middle Grey
The middle grey meter is designed to give you photographer the right readings of exposure in average circumstances. When the camera looks at a scene it will read it as an average reflectance which is 18%, this is middle grey. When camera looks at a scene and it is too bright it will darken the photo causing under-exposure, but if the photo is to dark it brightens it up causing over exposure.


Reflective and Incident metering
There are two ways of measuring light when taking a photo the most common one is a reflective reading this the one which the camera aromatically uses, it work by picking up how much light is being reflected off of the main focus in the image. Incident lighting is when you have a separate reader, this is mainly used in a studio or somewhere where lighting is controlled, it is used for things such as portraits, product, fashion and still life, incident measuring take an exposure measurement straight from the light source which is being used.

My Examples
Evaluative Mode


Center-Weighted Average


Spot Metering


Monday, 9 November 2015

Creative Studio Influences


Movement and Experimenting with Light

In all of these photos I was testing out how different shutter speeds, Apertures and different forms of movement would affect the final outcome of the photo.


In these first two pictures even though the final effect is very interesting and complex, when the photo was actually taken it was taken very simply. I started by finding a light, once I found the light I focused on it and set the shutter speed to 10 seconds, this was to give me enough time to capture all of the light, my aperture was also very low so I didn't capture a lot of the background and mainly focused on the light trail. Instead of moving the light like a lot of people do I moved the camera to get the certain shape and pattern which is shown.


In these last two photos I wanted to test out how a lighter would affect the final out come from a slow shutter speed. Unfortunately the final outcome wasn't how I expected but still captured the full light movement and details. An effect that came out which I didn't expect was the movement of the hand and how the hand has smudged creating multiple images. Like the ones above I used a low aperture so only the lighter was the thing people focus on and there wasn't any of the background which could distract the viewer, for this I had the shutter speed a little bit faster, I was on for only 5 seconds.


The photos above were taken while driving down the road in a car, I did this by pointing the camera out of a window on a 10-15 second shutter speed. Before taking the photo I didn’t know what effect the lights were going to give, I knew the light was going to smudge and create different effects but I didn't know it was going to create an electrical light feel. An effect that I like but wasn't supposed to come out is the speed sign in the last photo, I like this because of the view you get of it, you can see the pattern but you really have to focus on it to find out what it actually is. For these photos I had the aperture higher than the others because even though I wanted the main light trails to be the main focus I also wanted to give the viewer a clue to what it actually was or where the lights were actually coming from. Although a bad this about this is because I have had a higher aperture the light trails are brighter and sometime are completely white which doesn’t give me the full effect of the light trails.


Thursday, 5 November 2015

Photography Theory and Practice - Motion in photos

Motion in photos


When taking a photo and focusing on movement and time there are a lot of factors you need to thing about for example if you want to capture a moving thing as your main focus and wanted to show the moment then you would take the photo on a low shutter speed which would create motion blur showing to the viewer that there is movement present. Another things you have to think about if you want to capture something with moment but show it as if it didn't have movement for example if you wanted to take a photo of a footballer running but wanted to capture the whole detail of the footballer you would take the photo with a high shutter speed, this would capture the main focus with now sign of moment creating a statue like image. when taking a photo and you want to capture blur but also want to capture a model in the photo to make it so the model isn’t standing there for hours you can capture the models details with a flash which keeps the image of the model there while movement and blur is being created in the photo.


Harold Edgerton
  

Harold Edgerton was a photographer who was born in 1903, one of the most famous things Harold Edgerton is known for is the photo above (apple being shot) and another thing he’s famous for is the milk drop on cranberry juice which creates a slow motion colour change. He was one of the first photographers to focus on capturing movement. He would have done this by using a very fast shutter speed so it captures the moving target as a still image, having the shutter speed fast it removes and motion in the photo and give the main focuses a statue like feel.


Seth Casteel 
 

Seth Casteel is a photographer who specializes in taking photos crating movement into statue like images. One of his most famous projects which does this is a project called Underwater Dogs this involved throwing a ball into a pool causing the dog to chase it and Seth Casteel would catch the dog as it jumps. Like Harold Edgerton to make sure that the moving main focus looks statue like the shutter speed would have been very fast.
My Examples 


Thursday, 29 October 2015

Studio Lighting test And First Studio Session

First Studio Session


some of these photos aren't very good, this is because when we first got into the studio the main focus was just getting a feel off it and how to take photos in the studio.

Playing with Light.


In all of these photos we were testing the lighting and how it affected the look of the model, where it would create shadows, where there would be too much exposure and were the lighting would bring out details and create contrast. The lighting technique we used was Rembrandt lighting. We kept the background white to create contrast between the model and background, on the models face we have created brighter side, I have done this with a fill light, by doing this it brings out detail in one side of the face and exposes the features, on the side which isn’t being exposed by the fill light it is dark, this creates contrast with the background and with the lighter side of the face. to make sure that the side which is dark isn’t too dark I have set up a light with a soft box on, this means light still reaches the face but isn’t to harsh which still creates darkness but adds enough light to create detail on the dark side.